WordPress Visual Preview
Overview
The WordPress Visual Preview plugin is a custom solution developed by Together that enables content editors to see real-time visual previews of their pages directly within the WordPress admin interface. This plugin bridges the gap between WordPress as a headless CMS and Next.js frontend applications, providing an intuitive editing experience.
What it does
- Live Preview: View your page changes in real-time as you edit ACF fields and content
- Interactive Navigation: Click on sections within the preview to jump to the corresponding field in WordPress
- Scroll Synchronization: Maintains scroll position between WordPress and the preview iframe
- Section Highlighting: Automatically highlights and focuses on the section you're currently editing
- Deployment Integration: Trigger production deployments directly from WordPress when changes are ready
Why use it?
When working with headless WordPress and Next.js, content editors typically need to:
- Make changes in WordPress
- Save the page
- Open a new browser tab
- Navigate to the preview URL
- Refresh to see changes
This plugin eliminates these steps by embedding the preview directly in WordPress, dramatically improving the content editing workflow and reducing the time between edit and preview.
Prerequisites
Before setting up the WordPress Visual Preview plugin, ensure you have:
- A WordPress site using ACF (Advanced Custom Fields) for content management
- A Next.js frontend application deployed on Vercel
- WordPress backend connected to the Next.js frontend via REST API or GraphQL
- Access to WordPress admin with plugin installation privileges
- Access to Vercel project settings and API token generation
Repository
The WordPress plugin can be found here:
https://github.com/Made-Together/nextwptemplate-visual-editor
The plugin includes:
- WordPress admin UI components
- Deployment status tracking
- Vercel integration for triggering builds
- Preview iframe management
Installation & Setup
Step 1: Update Next.js Preview File
First, you need to update or create the preview route in your Next.js application. This file handles the communication between WordPress and the preview iframe.
Create or update pages/preview.tsx (or app/preview/page.tsx for App Router) with the following code:
import Template from "~/pages/[...slug]";
import cms from "~/cms";
import getListingPageData from "~/cms/getListingPageData";
import React, { useEffect } from "react";

// Handles messages from the parent window (scroll position sync)
function handleMessage(event) {
  if (event.data && event.data.type === "getScrollPosition") {
    window.parent.postMessage(
      {
        type: "scrollPosition",
        x: window.scrollX,
        y: window.scrollY,
      },
      "*"
    );
  }
  if (event.data && event.data.type === "setScrollPosition") {
    window.scrollTo(event.data.x, event.data.y);
  }
}

// Handles clicks on sections with data-id, notifies parent
function handleSectionClick(event) {
  const section = event.target.closest("section[data-id]");
  const parent = event.target.closest("[data-id]");
  if (section || parent) {
    const dataId = section?.getAttribute("data-id") || null;
    const parentId = parent?.getAttribute("data-id") || null;
    window.parent.postMessage(
      { type: "sectionClicked", sectionId: dataId, parentId },
      "*"
    );
  }
}

export default function Preview(data) {
  useEffect(() => {
    window.addEventListener("message", handleMessage);
    window.addEventListener("click", handleSectionClick);

    // Notify parent that iframe is ready to be scrolled
    window.parent.postMessage({ type: "iframeReadyForScroll" }, "*");

    return () => {
      window.removeEventListener("message", handleMessage);
      window.removeEventListener("click", handleSectionClick);
    };
  }, []);

  return (
    <div className="preview">
      <Template {...data} />
    </div>
  );
}

export async function getServerSideProps(ctx) {
  const {
    query: { post_id, post_type, previewPathname },
  } = ctx;
  let slug = previewPathname;
  let postListingResponse = {};

  try {
    postListingResponse = await getListingPageData({ slug });
  } catch (error) {
    // eslint-disable-next-line no-console
    console.error("Error getting listing page data", error);
  }

  // If the page is a listing page, use the base_path to get the acf fields for the top level page
  const basePath = (postListingResponse as { base_path?: string })?.base_path;
  if (basePath) {
    slug = basePath;
  }

  const [page, options] = await Promise.all([
    cms.preview(post_id, post_type),
    cms.options(),
  ]);

  return {
    props: { page, options, postListingResponse },
  };
}
Key Components Explained:
- handleMessage: Manages scroll position synchronization between WordPress and the preview
- handleSectionClick: Detects when users click on sections in the preview and notifies WordPress to jump to the relevant field
- getServerSideProps: Fetches preview data from WordPress using the post ID and type
- data-id attributes: Ensure your Next.js components include
data-idattributes on sections you want to be clickable/editable
Step 2: Install WordPress Plugin
- Download the plugin from the GitHub repository
- Navigate to your WordPress admin dashboard
- Go to Plugins > Add New > Upload Plugin
- Upload the plugin ZIP file
- Click Install Now
- After installation, click Activate Plugin
Step 3: Configure Plugin Settings
Navigate to Settings > Visual Preview (or /wp-admin/admin.php?page=deployment-status-settings) to configure the plugin.
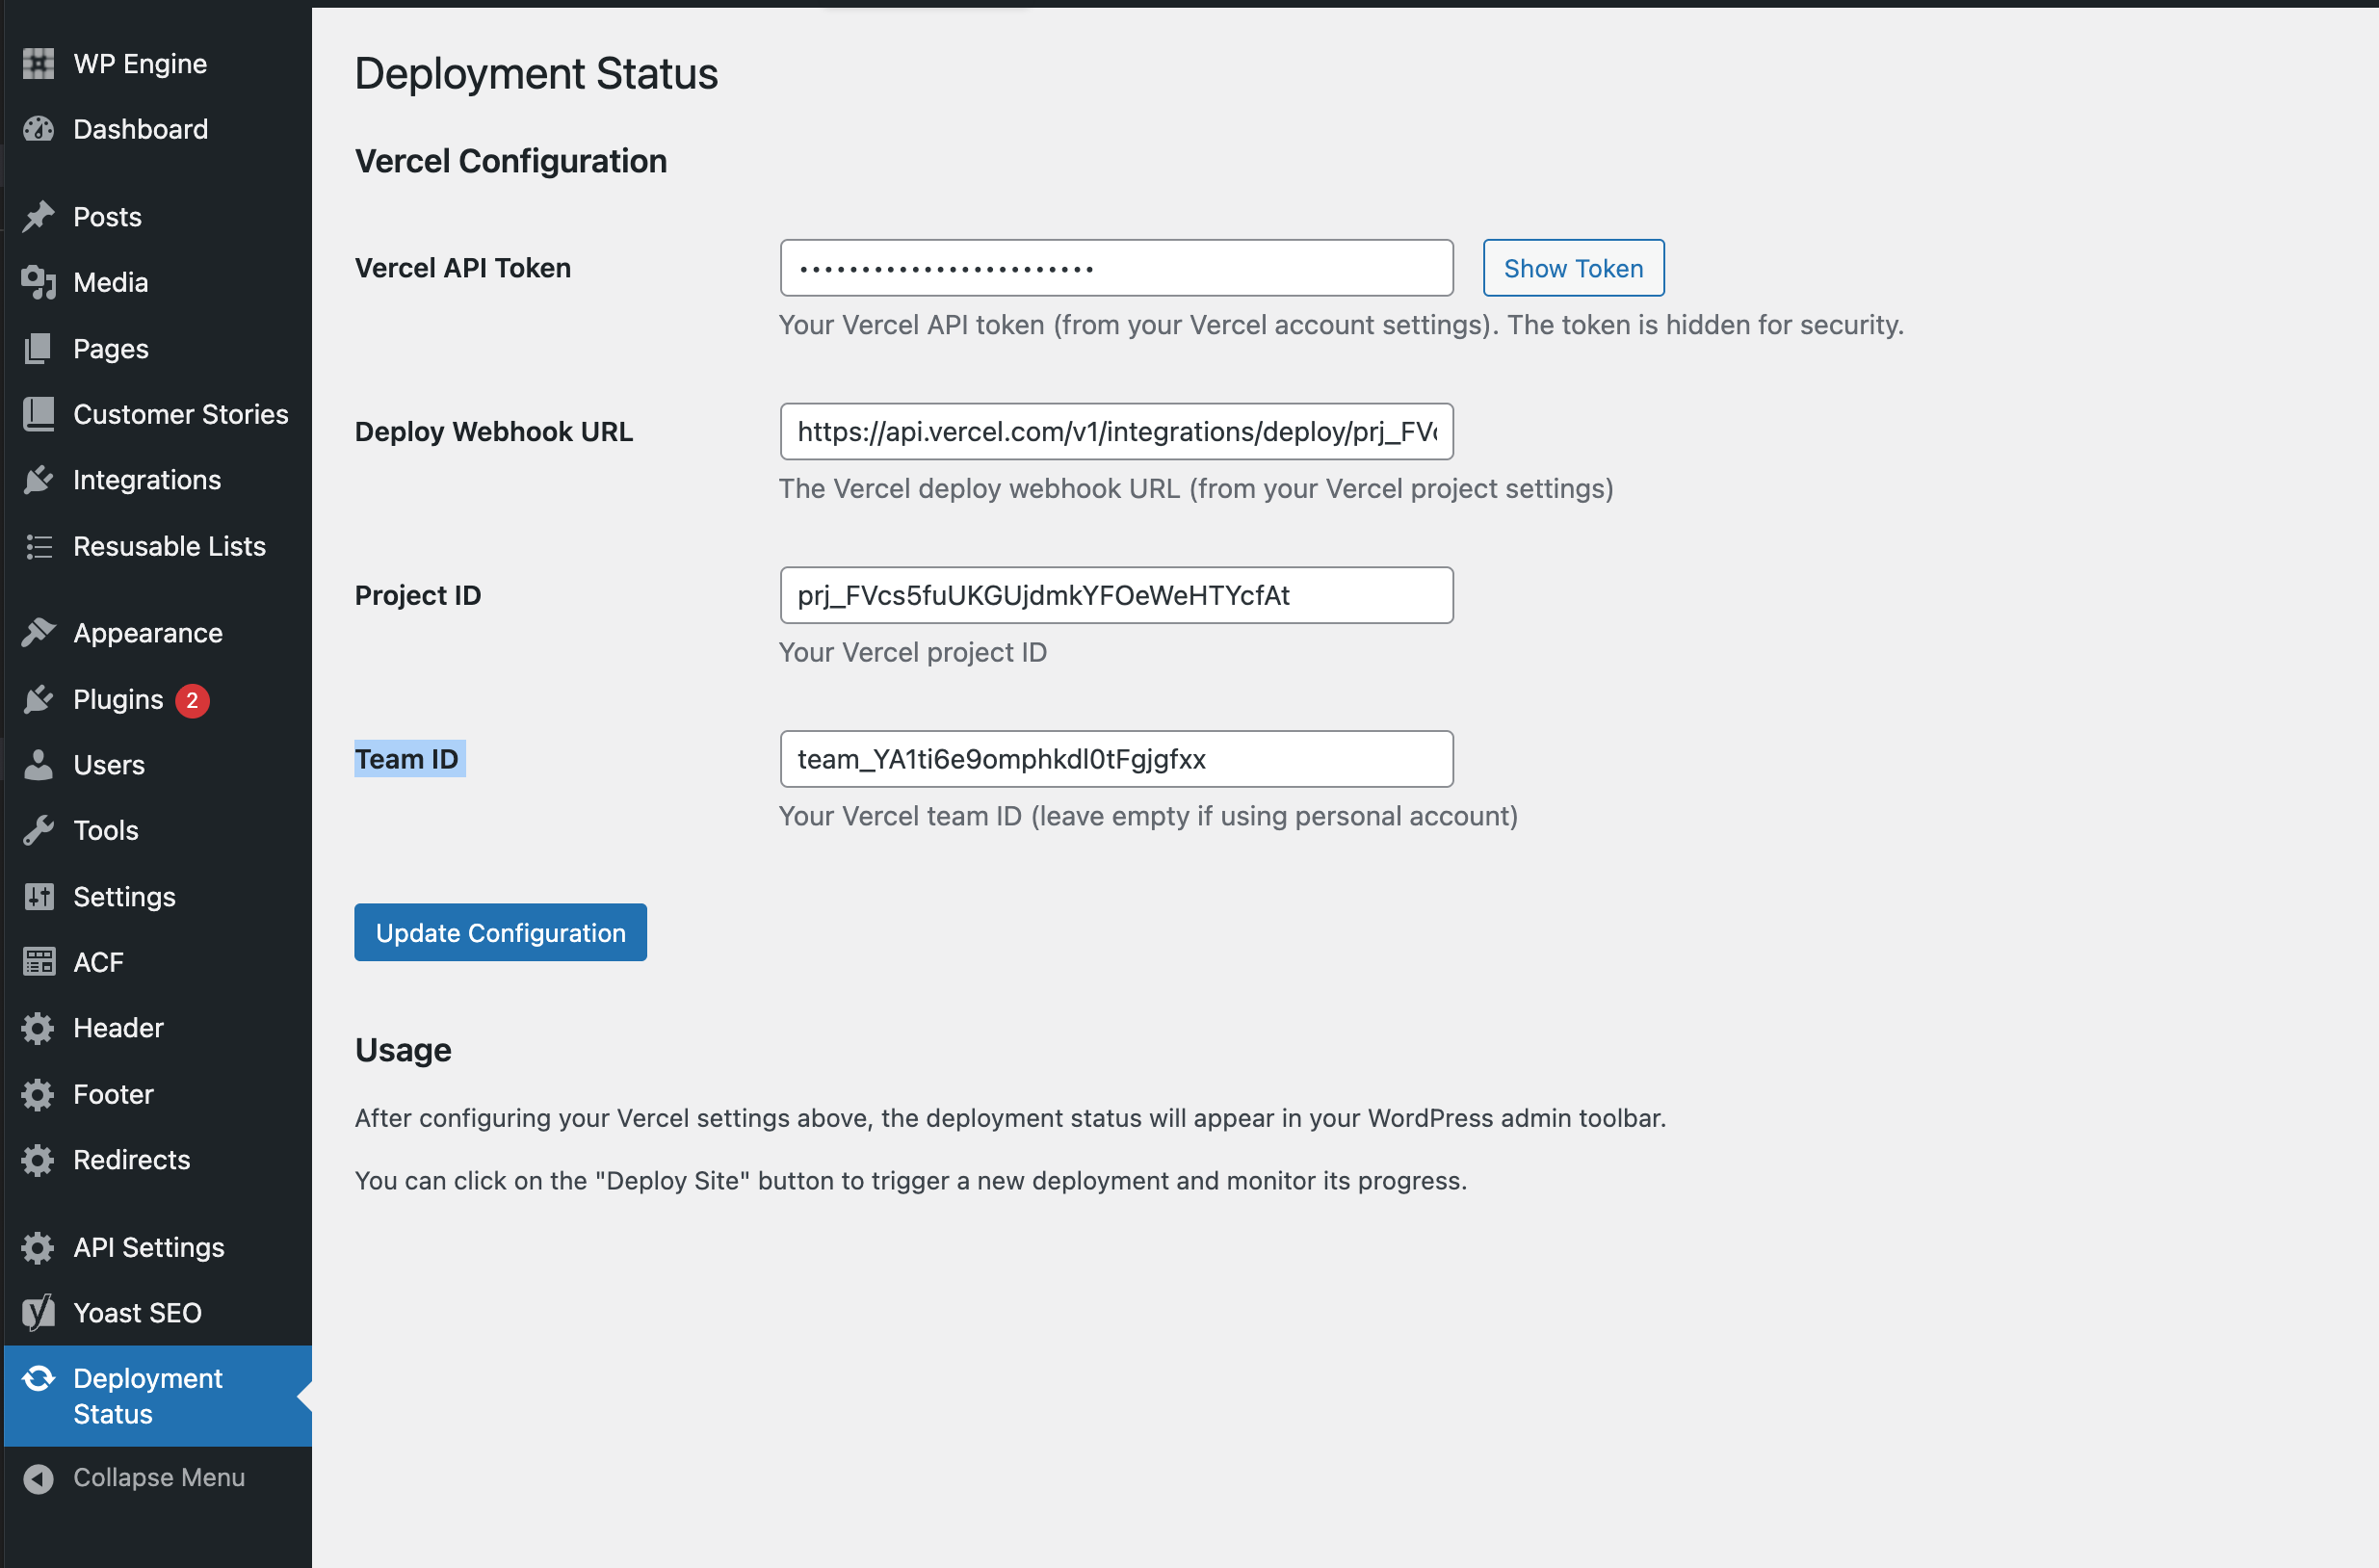
You'll need to provide the following credentials:
Vercel API Token
The API token allows WordPress to communicate with Vercel to trigger deployments.
How to generate:
- Go to Vercel Account Settings > Tokens
- Click Create Token
- Give it a descriptive name (e.g., "WordPress Visual Preview - [Project Name]")
- Set the scope to the specific project you want to deploy
- Click Create
- Copy the token and paste it into the WordPress plugin settings
⚠️ Important: Store this token securely. It won't be shown again after creation.
Deploy Webhook URL
This webhook URL triggers a new deployment when you publish changes.
How to find:
- Open your Vercel project dashboard
- Navigate to Settings > Git
- Scroll to the Deploy Hooks section
- Create a new deploy hook:
- Name: WordPress Deploy Hook
- Git Branch: main (or master, depending on your setup)
- Click Create Hook
- Copy the generated webhook URL
- Paste it into the WordPress plugin settings
Project ID
The unique identifier for your Vercel project.
How to find:
- Open your Vercel project dashboard
- Navigate to Settings > General
- Find Project ID in the project information section
- Copy and paste into WordPress plugin settings
Team ID
Your Vercel organization/team identifier.
How to find:
- From the Vercel dashboard, click on your team name in the top-left
- Select Settings
- Navigate to General tab
- Find Team ID in the team information section
- Copy and paste into WordPress plugin settings
Note: If you're using a personal account (not a team), you may be able to leave this field empty or use your account ID.
Step 4: Save Configuration
After entering all the required credentials:
- Click Save Settings
- Verify that all fields are correctly populated
- Test the connection by triggering a deployment
Using the Visual Preview
Editing Pages with Live Preview
Open a Page for Editing
Navigate to Pages in WordPress and click on any page to edit itView the Preview Panel
The visual preview will appear in a sidebar or dedicated section (depending on your theme)Make Changes
Edit ACF fields, update content, or modify page elements as usualSee Real-time Updates
The preview will automatically refresh to show your changesClick to Navigate
Click on any section in the preview to automatically scroll to and focus on the corresponding ACF field in WordPress
Deploying to Production
When you're ready to publish your changes to the live site:
Click the Deploy Button
In the WordPress admin, look for the deployment panel (typically in the sidebar when editing a page)Monitor Deployment Status
The plugin will show you the deployment progress through several stages:
 _Initial deployment trigger screen_
 _Webhook is being called_
 _Deployment has been queued in Vercel_
 _Vercel is building your Next.js application_
 _Deployment complete and live_
- Verify Deployment
Once the status shows "Deployed", visit your live site to confirm the changes are live
Technical Details
How It Works
The Visual Preview plugin uses several technologies to create a seamless editing experience:
iframe Communication
The preview is loaded in an iframe that communicates with WordPress using thepostMessageAPIServer-Side Rendering
Next.js fetches the latest preview data from WordPress using the preview endpointData Attributes
Components in your Next.js app must includedata-idattributes that correspond to ACF field namesVercel API Integration
The plugin uses Vercel's REST API to trigger deployments and check build status
Required Component Setup
For the click-to-navigate feature to work, your Next.js components should include data-id attributes:
// Example component with data-id
export default function HeroSection({ data }) {
  return (
    <section data-id="hero_section" className="hero">
      <h1 data-id="hero_section_title">{data.title}</h1>
      <p data-id="hero_section_description">{data.description}</p>
    </section>
  );
}
The data-id value should match the ACF field name in WordPress.
Preview URL Structure
The preview URL follows this pattern:
https://your-site.vercel.app/preview?post_id=123&post_type=page&previewPathname=/about
Parameters:
post_id: WordPress post IDpost_type: WordPress post type (page, post, custom post type)previewPathname: The slug/path of the page being previewed
Troubleshooting
Preview Not Loading
Issue: The preview iframe shows a blank screen or error message
Solutions:
- Verify your Next.js preview route is deployed and accessible
- Check that your Vercel project URL is correct in plugin settings
- Ensure CORS is properly configured to allow iframe embedding
- Check browser console for any JavaScript errors
Deployment Not Triggering
Issue: Clicking deploy doesn't start a build
Solutions:
- Verify all Vercel credentials are correct
- Check that the Deploy Webhook URL is from the correct project
- Ensure your Vercel API token has permissions for the project
- Test the webhook URL manually using curl or Postman
Click-to-Navigate Not Working
Issue: Clicking sections in the preview doesn't focus the corresponding field
Solutions:
- Ensure components have the correct
data-idattributes - Verify
data-idvalues match ACF field names exactly - Check browser console for postMessage errors
- Make sure the handleSectionClick function is working in the preview file
Scroll Position Not Syncing
Issue: Scroll position doesn't maintain between WordPress and preview
Solutions:
- Check that handleMessage function is properly implemented
- Verify no JavaScript errors in browser console
- Ensure the iframe is fully loaded before attempting to sync
Build Status Stuck
Issue: Deployment status shows "Building" indefinitely
Solutions:
- Check Vercel dashboard for actual build status
- Verify Team ID and Project ID are correct
- Look for build errors in Vercel deployment logs
- Try manually refreshing the deployment status in WordPress
Best Practices
Use Descriptive data-id Values
Make yourdata-idattributes clear and match ACF field names exactlyTest Before Deploying
Always use the preview to verify changes before triggering a production deploymentOptimize Preview Loading
Keep your preview route lightweight to ensure fast loading timesDocument Custom Implementations
If you customize the preview functionality, document your changes for the teamRegular Plugin Updates
Check the GitHub repository for updates and new featuresSecurity
Keep API tokens secure and never commit them to version control
Additional Resources
Support
If you encounter issues not covered in this documentation:
- Check the plugin's GitHub Issues page
- Review Vercel deployment logs for build errors
- Contact the Together development team for assistance